
The commands that work on most version of Linux environment are listed below.
1. Identify OS Version
$ lsb_release -a //Identify exact version of OS
$ uname -a //Identify 64 or 32 bit version

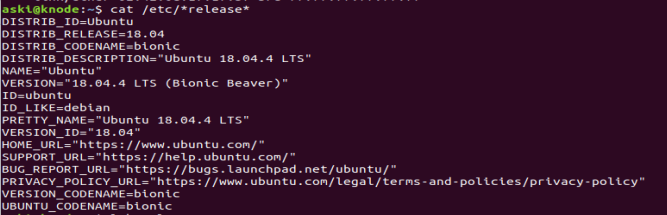
$ cat /etc/*release*
$ cat /proc/version
2. Identify Open ports
$ sudo lsof -i -P -n
$ sudo lsof -i -P -n | grep LISTEN
3. Restart or Reboot server
$ sudo reboot
 Starts at 30$ per month
$ sudo shutdown -r //command restarts server
$ sudo shutdown -r +30 //command restart server in another 30 mins
4. Vi Text Editor – How to save the changes and quit the editor?
- After making changes, press Esc Key
- Press : (colon). You will notice your cursor appearing at the lower left corner of the screen beside a colon prompt.
- Enter any of these options as per your need.
wq! = write the changes to file and quit
q! = exit without writing the changes.
w! = write the changes to file without exiting
5. Disable IPv6
Step 1: “ip address” command shows that IPv6 is unnecessarily enabled on the interfaces.
server@it:~$ ip
2: eth0: <BROADCAST,MULTICAST,UP,LOWER_UP> mtu 1500 qdisc mq state UP group default qlen 1000
link/ether 00:15:7e:46:8d:63 brd ff:ff:ff:ff:ff:ff
inet 192.168.1.2/24 brd 192.168.1.1 scope global eth0
valid_lft forever preferred_lft forever
inet6 fe80::215:5dff:fe64:8d36/64 scope link
valid_lft forever preferred_lft forever
Step 2: use editor to add configurations to disable IPv6
server@it:~$ sudo nano /etc/sysctl.conf
net.ipv6.conf.all.disable_ipv6=1
net.ipv6.conf.default.disable_ipv6=1
net.ipv6.conf.lo.disable_ipv6=1
Step 3: reload sysctl
server@it:~$ sudo sysctl -p
Step 4: review interfaces
server@it:~$ ip a
2: eth0: <BROADCAST,MULTICAST,UP,LOWER_UP> mtu 1500 qdisc mq state UP group default qlen 1000
link/ether 00:15:7e:46:8d:63 brd ff:ff:ff:ff:ff:ff
inet 192.168.1.2/24 brd 192.168.1.1 scope global eth0
valid_lft forever preferred_lft forever
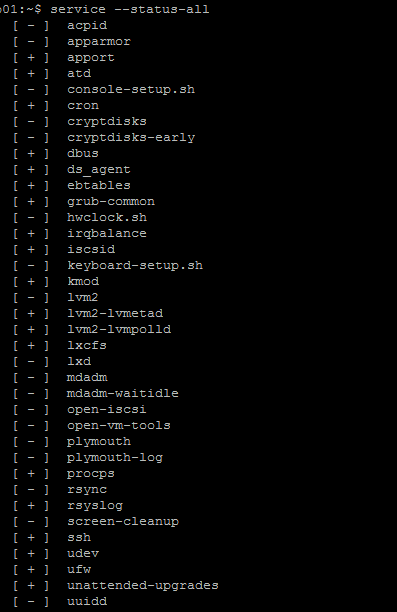
6. List Status of all installed services
$ service –status-all
7. UFW – Uncomplicated Firewall
$ sudo service ufw {status | start | stop | restart | force-reload}
8. Purge vs Remove
$ apt remove <package_name> //Command uninstall the package however the configuration files remain on the system.
$ apt purge <package_name> //Command uninstall the package and removes all the configuration files except those exist in home folder (/home/bob)
9. Get MAC address (2 options)
$ ifconfig -a
$ ip link

10. Release and renew IP address DHCP
$ dhclient -r <interface_name> // -r to release existing IP address of interface e.g eth0
$ dhclient <interface_name> // renew IP address for interface e.g. eth0
11. Swap
Swap is a temporary hard drive space that operating system can temporarily store data that it can no longer hold in RAM. The swap space on the hard drive is used mainly when there is no longer sufficient space in RAM.
The information written to disk will be significantly slower than information kept in RAM, but the operating system will prefer to keep running application data in memory and use swap for the older data. Overall, having swap space as a fall back for when your system’s RAM is depleted can be a good safety net against out-of-memory exceptions on systems with non-SSD storage available.
To view swap space in your Ubuntu system (2 options
$ sudo swapon –show
$ free -h

$ sudo swapoff -a //turn off swap space
$ sudo swapon -a //turn on swap space

12. Change Password
$ passwd //change password of logged in user
$ passwd {userName} //change password of another user
13. Install SSH
Before installing SSH, verify if SSH is already present in the server
$ service sshd status
If not installed, the output is unit sshd.service could not be found, then you can safely proceed with following commands to install open ssh server.
$ sudo apt update
$ sudo apt install openssh-server
14. Install Telnet
In minimal version of Ubuntu, telnet is not found by default. You can install by
$ sudo apt update
$ sudo apt-get install telnet
15. Install Ping
In minimal version of Ubuntu, ping is not found by default. You can install by
$ sudo apt update
$ sudo apt install iputils-ping
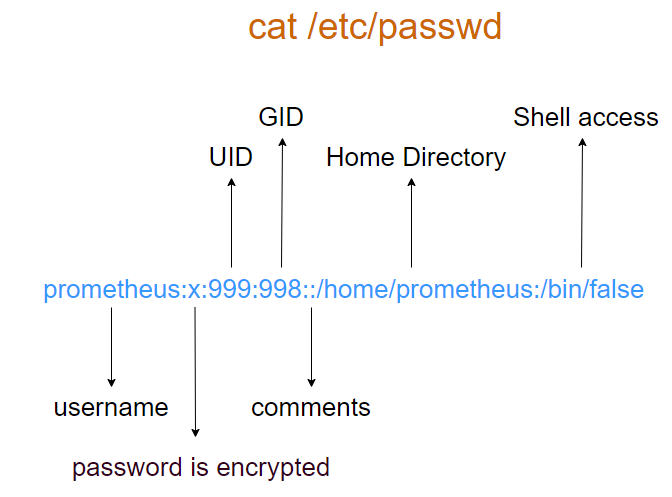
16. List of Users
$ cat /etc/passwd //you will be presented with list of users on Linux
prometheus:x:999:998::/home/prometheus:/bin/false
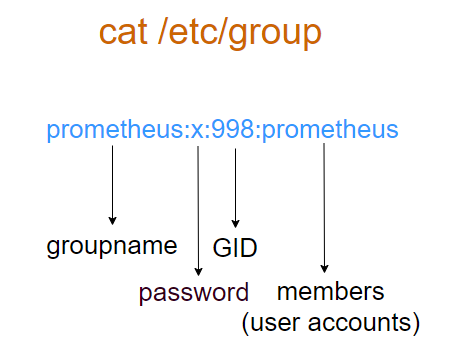
17. List of Groups
$ cat /etc/group //you will be presented with list of groups and also the users who are member of this group
prometheus:x:998:prometheus
18. Identify built-in init system
Recent versions of Linux use systemd (uses systemctl command), while older versions of Linux use System V init (uses service command). Use following command to identify init system
$ ps –no-headers -o comm 1
19. su (substitute user) command
$ su – <user_name> //to invoke another user’s shell and environment
$su <user_name> //to invoke another user’s shell within the working directory/user environment of logged in user
When the above command is used without the argument (user_name), then it switches to the superuser (root) account.
20. View member of group
$ members <group_name>
If members command is not found, install using $apt-get install members
21. View log files in real time
$ tail -f -n <output_last_N_lines> <path_to_log_file>
-f means append data as file grows (shows data in real-time)
22. View uncommented lines in a text file
grep -v ‘#’
so the command can be used as below to list lines without a #
$ cat <file_name> | grep -v ‘#’