In a highly critical environment, we strongly recommend to setup Cisco ASAs in high availability mode. This way, if the Active ASA unit fails, the Standby unit takes over the role and becomes Active. Before we proceed, you need to ensure that following pre-requisites are met
- Both Cisco ASA units must be an identical hardware model.
- Both Cisco units must have same ASA software image version and proper license.
- Older versions of ASA requires that license match on each unit that forms failover
- Starting from 8.3(1), no need for identical license. Typically, we buy license only for primary unit for Active/Standby failover, the secondary unit inherits the license when it becomes active. If we have licenses on both the units, they combine into a single running failover cluster license.
- Do not configure “nameif” on the failover interface.
Setup High Availability in Cisco ASA
1.Update High Availability License Key on both ASA units, otherwise ASA cannot recognize “failover” command.
2.Upgrade both ASA units to match ASA and ASDM software image version.
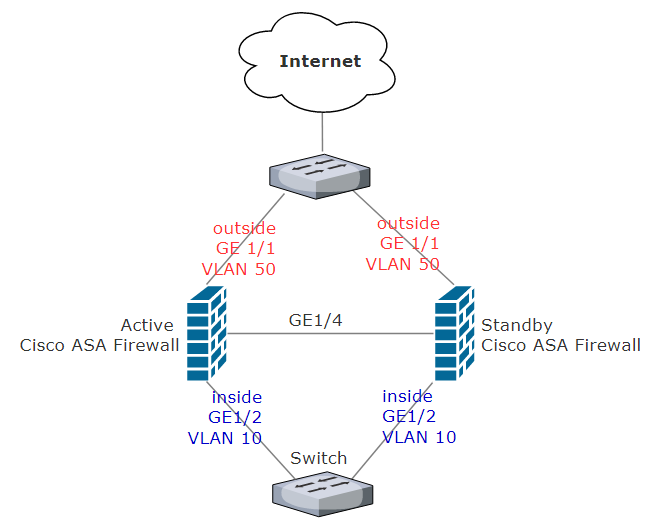
3.Connect a straight cable between ASAs through a dedicated failover link, in this diagram, we dedicate gigabit ethernet port 1/4 to be failover/sync link.
The ASA supports Auto-MDI/MDIX on its copper Ethernet ports, so you can either use a crossover cable or a straight-through cable. If you use a straight-through cable, the interface automatically detects the cable and swaps one of the transmit/receive pairs to MDIX.
4.Configuration on Primary ASA
Specify this ASA unit as Primary
(config)# failover lan unit primary
Assign failover interface as GigabitEthernet 1/4
(config)# failover lan interface folink gigabitethernet 1/4
INFO: Non-failover interface config is cleared on GigabitEthernet1/4 and its sub-interfaces
Assign unique IP address for failover and heartbeat
(config)# failover interfaces ip folink 10.10.1.1 255.255.255.252 standby 10.10.1.2

 $2.75 per month
Specify failover key and make sure you mention the same key on Standby unit
(config)# failover key 667788
Activate failover
(config)# failover
Enable failover interface
(config)# interface gi 1/4
(config-if)# no shutdown
Prompt ASA to show its Active or Standby State
(config)# prompt hostname priority state
(config-if)# write memory
5.Configuration on Standby ASA
Note: Standby ASA doesn’t need any configuration apart from following failover setup, because whatever you configured on ASA will be overwritten and synced from Primary ASA. Again, you do not even need to configure passwords on Standby ASA.
# show run int Gi 1/1
interface GigabitEthernet1/1
shutdown
nameif outside
security-level 0
ip address dhcp setroute
By default, ASAs come along with “dhcp client” enabled on Gi1/1 as you see below, disable dhcp client before we proceed.
If you have not seen dhcp client, just skip this step.
# config t
(config)# int Gi 1/1
(config-if)# no ip address dhcp
Configure failover
(config)# failover lan interface folink gigabitethernet 1/4
INFO: Non-failover interface config is cleared on GigabitEthernet1/4 and its sub-interfaces
(config)# failover interfaces ip folink 10.10.1.1 255.255.255.252 standby 10.10.1.2
(config)# failover key 667788
(config)# failover
DHCP Client cannot be enabled on interface, Gi1/1(outside)
failover is not compatible with above configurations,
user must manually remove or fix them as instructed before failover can be enabled.
(you will not see above message, if you have already disabled dhcp client)
(config)# interface gi 1/4
(config-if)# no shutdown
(config-if)# exit
(config-if)# write memory
By now, all configurations are automatically copied from Primary Cisco ASA to Standby Cisco ASA.
6.Verify Failover State
# show failover
# show failover state
# show failover summary
All the configuration on the Primary unit will be copied over automatically to Standby unit, as the failover is successfully configured.
Additional information
- It is recommended that a dedicated interface must be used for the LAN Failover interface. The interface can be connected to an intermediary switch or directly with a crossover cable.
- By default, all the ASA interfaces are monitored for their health with hello packets. Use the “no monitoring-interface int_name” global command if you want to remove monitoring for a particular interface
- Upon failover, the standby ASA (now active) swaps all interface IP addresses and mac-addresses with the previously active ASA to maintain consistency in the ARP cache.
- Once the devices are in the active/standby mode, changes done on the standby unit will not be replicated to the active unit. If changes are made on the standby unit, they can be discarded when you issue the “write standby” exec command on the active unit. It discards all the configuration except the failover commands on the standby unit.
- The terms Primary and Secondary are used only to determine the addressing provided to the firewalls. They do not define the active or standby roles. Either the primary or secondary unit can be in active or standby state.

Leave a Reply